How to Define an Action ?
info
This guide provides an overview of the process of creating actions in Thinstack, starting with the Action Builder and then moving to Input JSON for more granular control over the flow of conversations.
Select the chatbot you want to set up actions for. Navigate to the Actions section in the top navigation bar. Choose an existing action template or click New Action to create one from scratch.
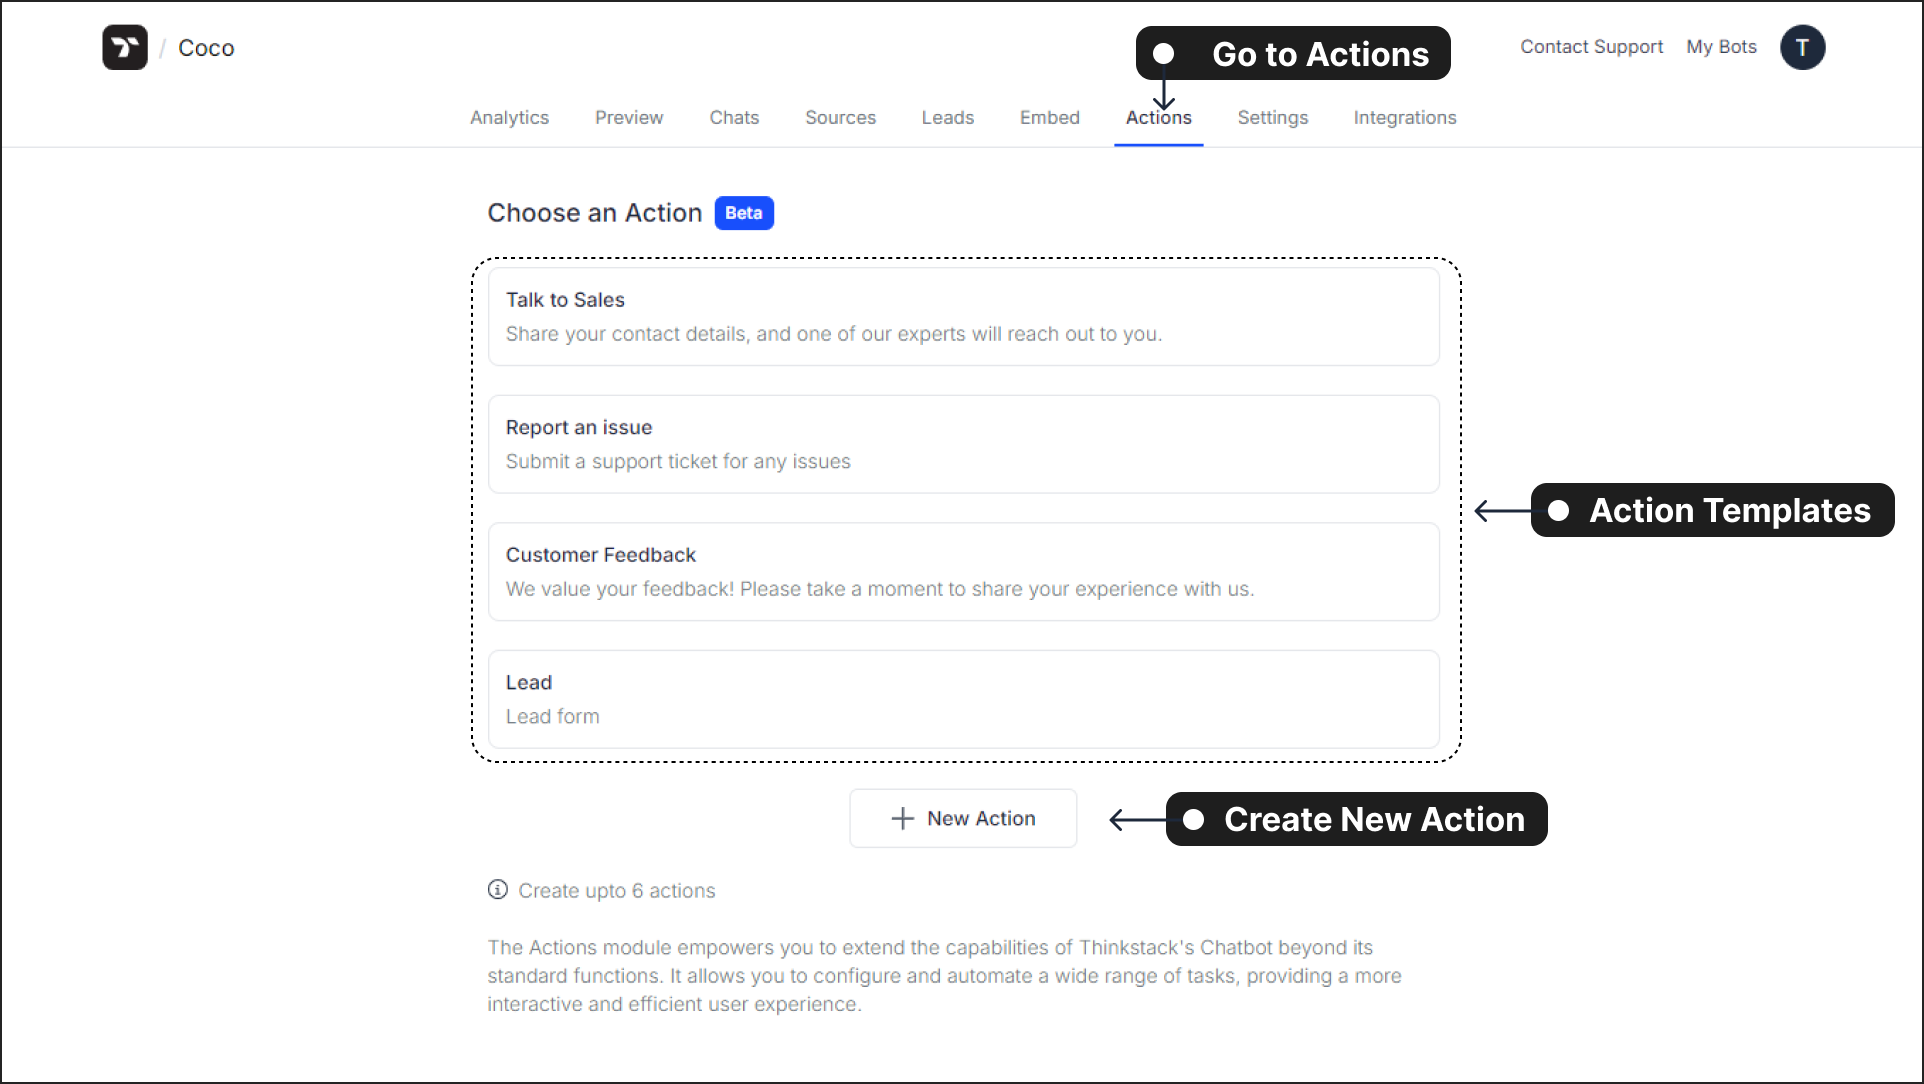
Step - 1: Set Up - Fill in "Basic Action Setup" details
Action Name: Enter a name for the action (up to 50 characters).
Action Description: Provide a brief description of what the action does (up to 150 characters).
Keywords/Phrases: Add keywords or phrases that will trigger this action. You can add up to 6, and 3 are already shown as examples. There's an "Add more" button if you need more than the initial three input fields.

Once you've filled in the details, click the Next > button to proceed to the "Configure" step.
Step - 2: Configure - Customize Action Behavior
This step allows you to define the conversational flow, data collection, and post-collection handling for your action.
Customize the "Initial Message":This is the opening message your chatbot will display to the user when this action is triggered.
Edit the text field to craft a clear and engaging introduction to your action.
Example: "Would you like to raise a support ticket? Shall we proceed?"

Define and Manage "Collect Data" Fields: In this section, you specify the pieces of information your chatbot needs to gather from the user.

To create a new data field: Click the + Add Field button. A modal will appear, allowing you to define the field's properties.
When defining or editing a field, you can set:
-> Field Type: Choose between Text, Number, or Choices (for predefined options).
-> Field Name: An internal identifier for the data (e.g., name, issue, email).
-> Description: This text serves as the prompt or question the chatbot asks the user.
-> Field Mandatory: Toggle this switch if the information is required to proceed with the action.

- Select "Post Data Collection" Handling: After the chatbot successfully collects all specified data, this section dictates how that data will be processed or sent.

Choose one of the following integration options:
-> Thinstack: Save the collected data directly within your Thinstack chatbot's internal records.
-> Zapier: Integrate with Zapier to automate sending the data to a wide range of external applications (e.g., CRM, spreadsheets, email services).
-> Rest API: Send the data to a custom backend system or external apps like Zendesk, Freshsales, Hubspot etc using a REST API call.
- Craft the "Exit / Final Message": This is the concluding message displayed to the user once the action is completed.
Customize this message to provide a final confirmation, express gratitude, or inform the user about next steps.You can personalize the message by embedding collected data using $<field_name> (e.g., Thank you, $name!) or API responses with {{user.name}}.
Once all configurations are complete, you can:
-> Click Save & Test to save your changes and test the action's behavior in the preview pane.
-> Click Publish to make the action live and available for use with your Thinstack chatbot.
How to edit the action in JSON ?
What is JSON?#
JSON, or JavaScript Object Notation, is a lightweight data-interchange format that is easy for us to read and write and easy for machines to parse and generate. It is commonly used for transferring data between a server and a client in web applications.
note
🔸For further understanding on JSON, please refer to: JSON Introduction, Working with JSON
Sample JSON Structure for an Action#
warning
When you create an action, please adhere to the input JSON structure that is shown in the examples below for making the most out of the action feature, not following the JSON structure would leads in invalid schema error.
We recommend not changing the existing key-value pair in the JSON or adding your own key-value pair to avoid errors.
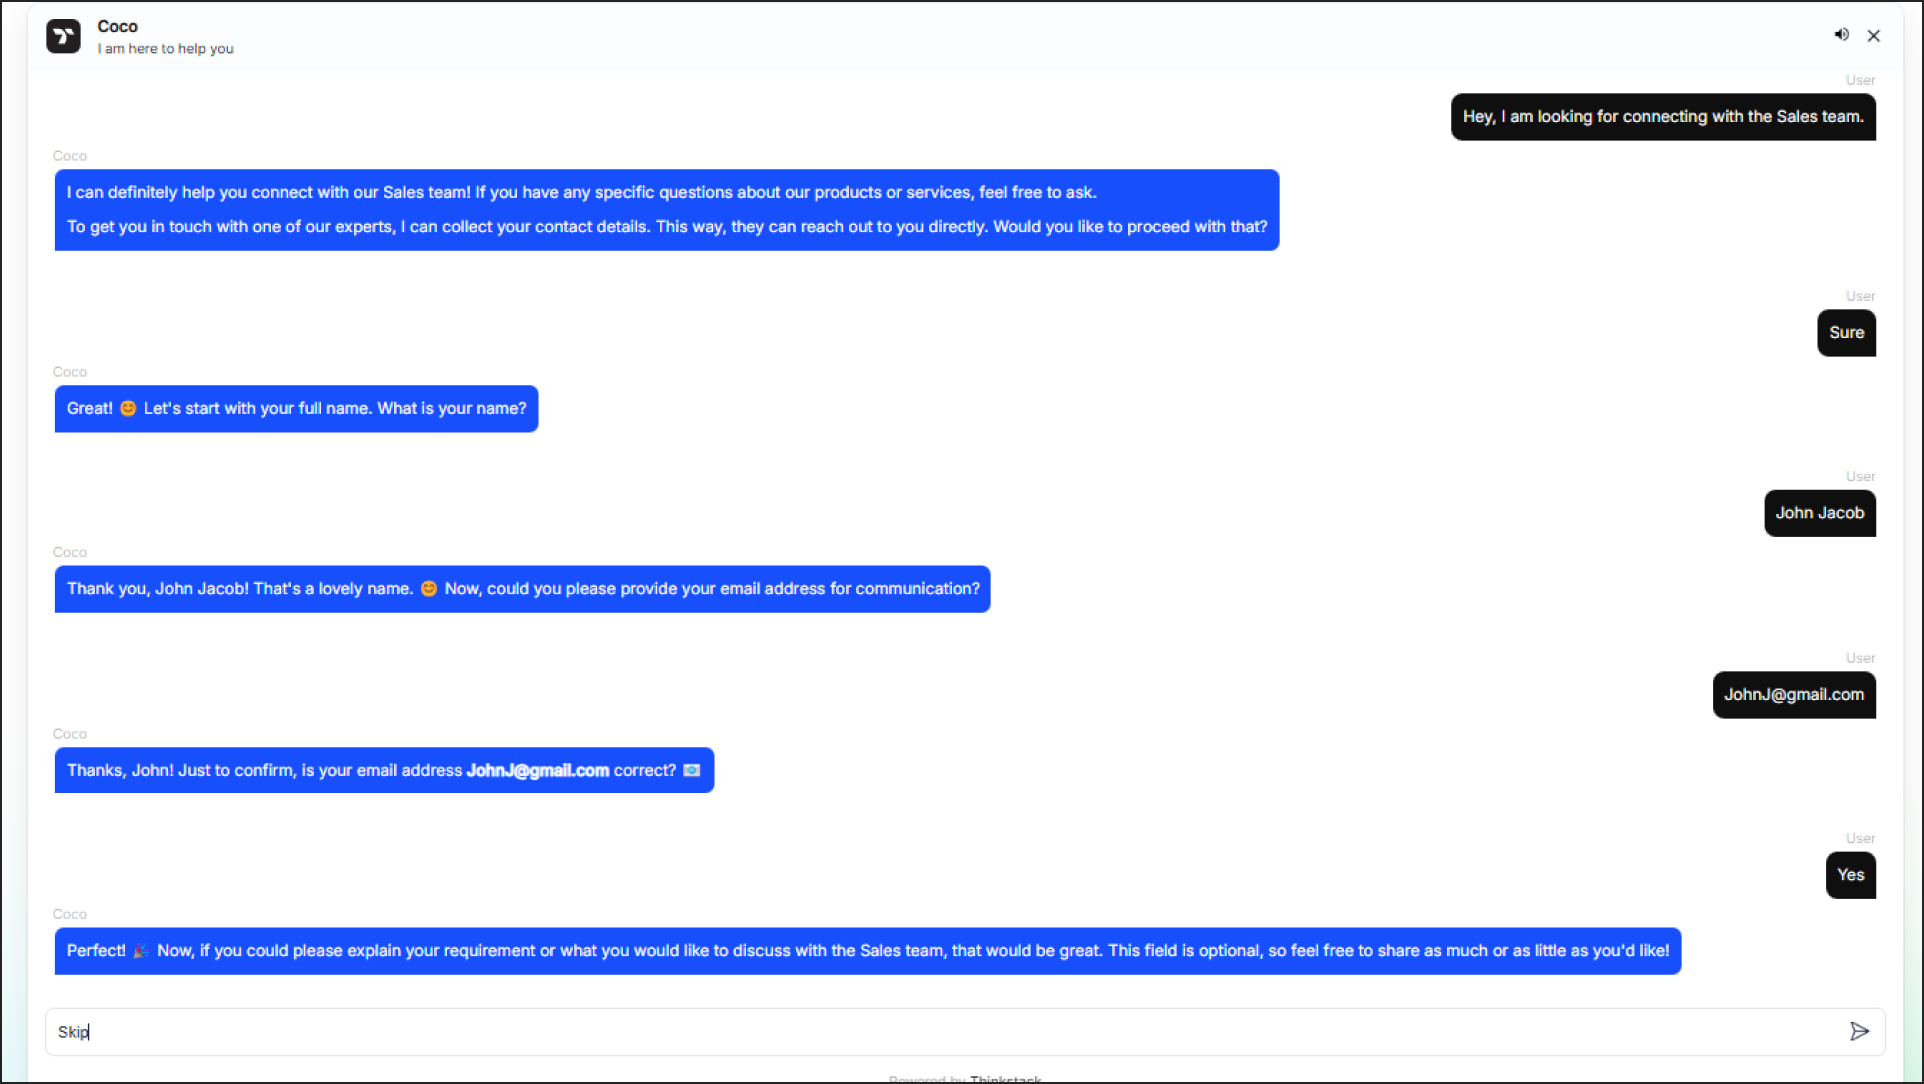
{ "name": "Talk to Sales", "description": "Share your contact details, and one of our experts will reach out to you.", "confirmation_message": "Great! To proceed, I’ll need your name, email, and any specific requirements. A sales expert will contact you shortly after submission. Is this okay?", "closure_message": "Thank you for providing your information. Our sales team will reach out to you shortly.", "actions": [ { "type": "form", "form": { "name": { "type": "TEXT", "description": "Full name of the user", "mandatory": true }, "email": { "type": "TEXT", "description": "Email address of the user for communication.", "mandatory": true }, "message": { "type": "TEXT", "description": "Explain your requirement", "mandatory": false } } } ]}Understanding the JSON Structure#
For the action "Talk to Sales", the chatbot collects basic contact details like name and email while allowing optional fields like a custom message. This ensures users can seamlessly provide necessary information.
Let's break down the key components of the Input JSON structure with examples:
Root Level Elements#
🔸 name: The name of the action which we are defining. (Example: "Talk to Sales", "Book Appointment")
🔸 description: A clear explanation that helps users understand what the action does (Example: "Connect with our sales team to discuss your needs")
🔸 actions: Contains all the interactive elements like forms and input fields
🔸 confirmation_message: This message is shown to the user before the action begins. The user is given the option to execute the action flow or choose not to proceed.
note
When an Action is triggered, the chatbot first searches the knowledge base and generates a response based on the user's query. After that, the confirmation message is shown to the user. Please ensure that the confirmation message aligns with the generated response; this may require some trial and error.
🔸 closure_message: This message is displayed to the user upon completion of the action flow. It confirms that the process has been successfully completed.
Form Field Properties#
Each form field in your action requires these essential properties:
🔸 type: Specifies how users input data (Examples: TEXT for names, PHONE for contact numbers, EMAIL for Email ID)
🔸 description: Guides the LLM to frame appropriate questions which helps the users understand what information to provide. (Example: "Enter your work email address")
🔸 mandatory: Indicates if users must fill this field (true) or can skip it (false)
note
Supported Data Types in JSON:
- TEXT: Represents free-form text.
- EMAIL: A valid email address format.
- PHONE: A valid phone number format.
- NUMBERS: Numeric values.
- BOOLEAN: True/False values.
- CHOICES: Can be either an
Array<String>or an object in the format{ [key: string]: Array<String> }.
JSON Structure for Advanced Actions#
Thinstack allows for more complex interactions through dynamic data types such as choices for clickable buttons or messages for static informational content. Here are examples of these advanced JSON structures:
1. Form with Choices (Clickable Buttons)#
This structure includes predefined options presented as clickable buttons in the chatbot. Choices can also depend on prior user inputs (e.g., dynamic choices for doctors based on the selected department).
Example JSON for Choices:
{ "name": "Take an Appointment", "description": "Book an appointment with a doctor in a specific department", "confirmation_message": "You're about to book an appointment with a doctor. You'll need to select a department and choose a date for your appointment. Would you like to proceed?", "closure_message": "Thank you for providing the necessary details. We'll confirm your appointment soon.", "actions": [ { "type": "form", "form": { "department": { "type": "CHOICES", "description": "Select the department for your appointment", "choices": [ "Cardiology", "Dermatology", "Pediatrics" ], "mandatory": true }, "date": { "type": "DATE", "description": "Choose a date", "mandatory": true } } } ]}🔸 CHOICES: Predefined options displayed as buttons for user selection.
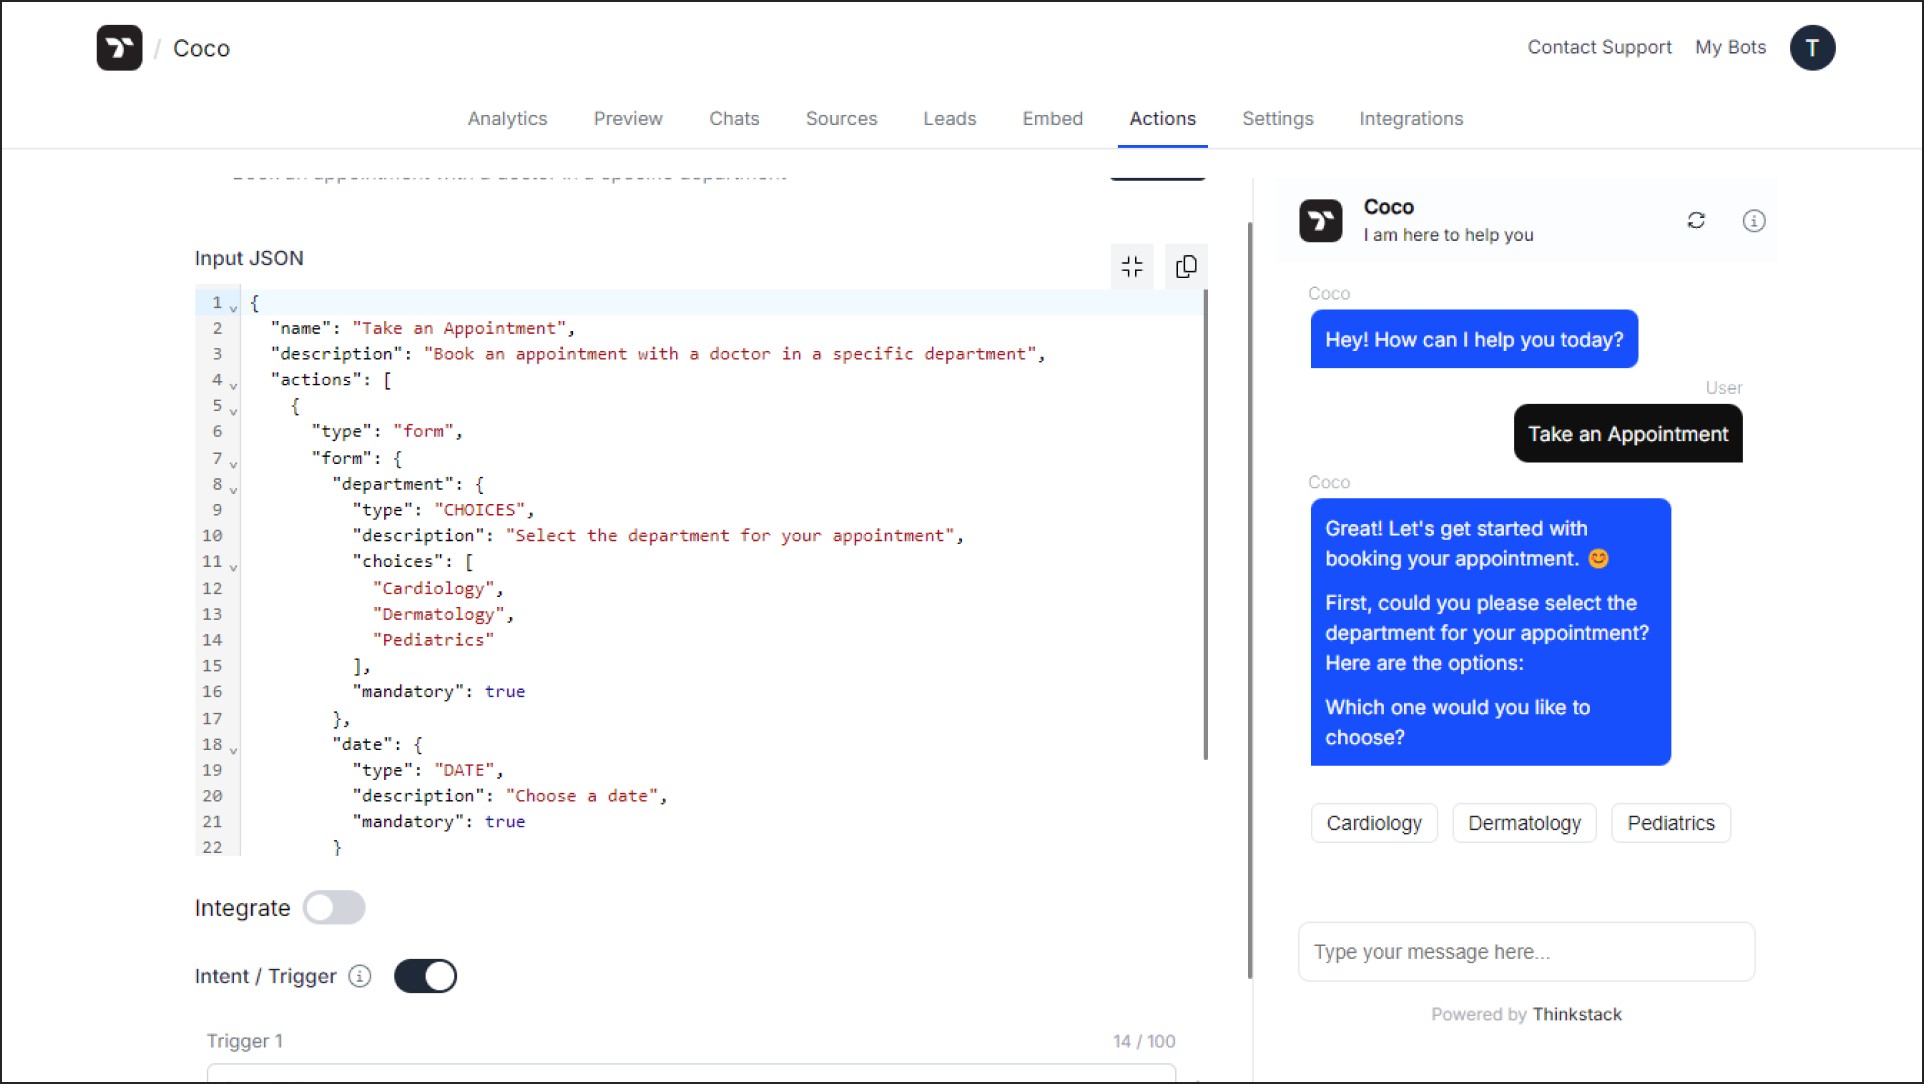 🔸 Dynamic Choices: Options (e.g., doctors) generated based on prior selections (e.g., department).
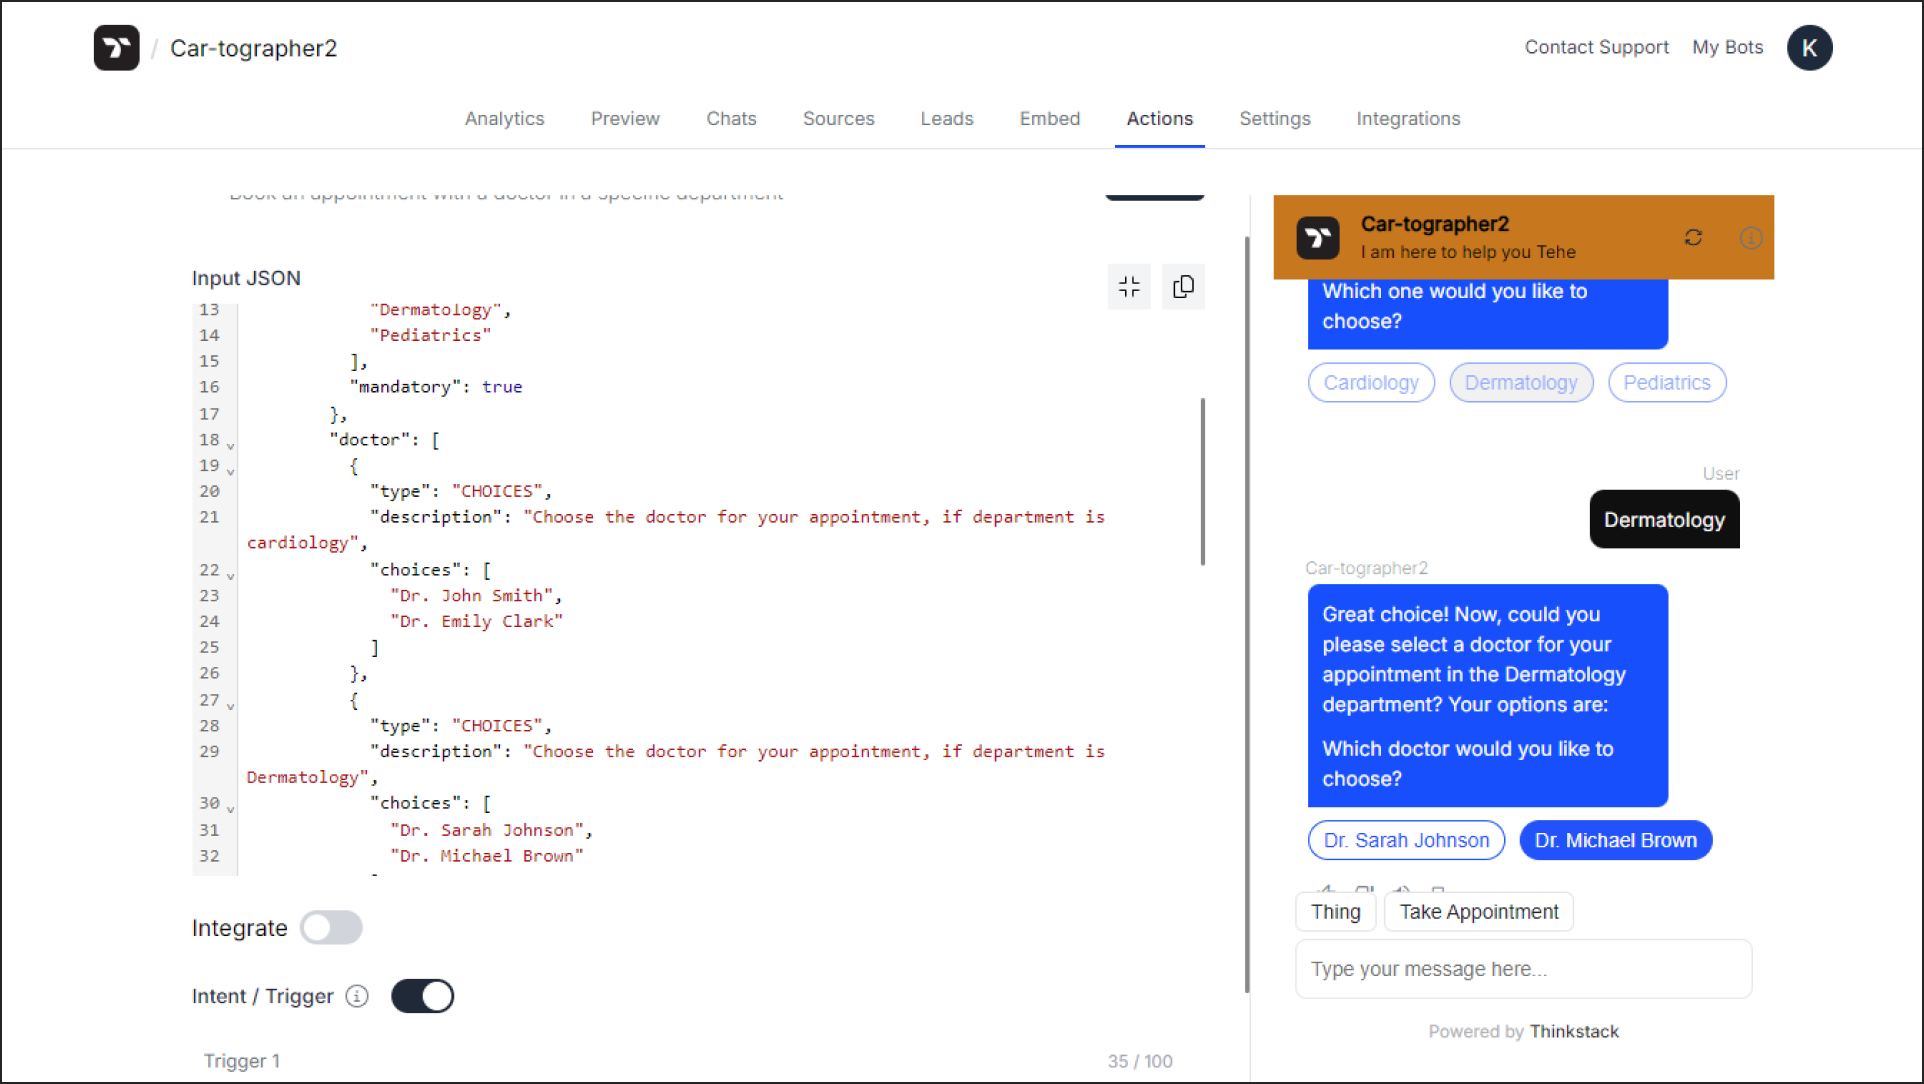 🔸 Other Fields: Collect additional details like date and time.
2. Actions with Static Messages#
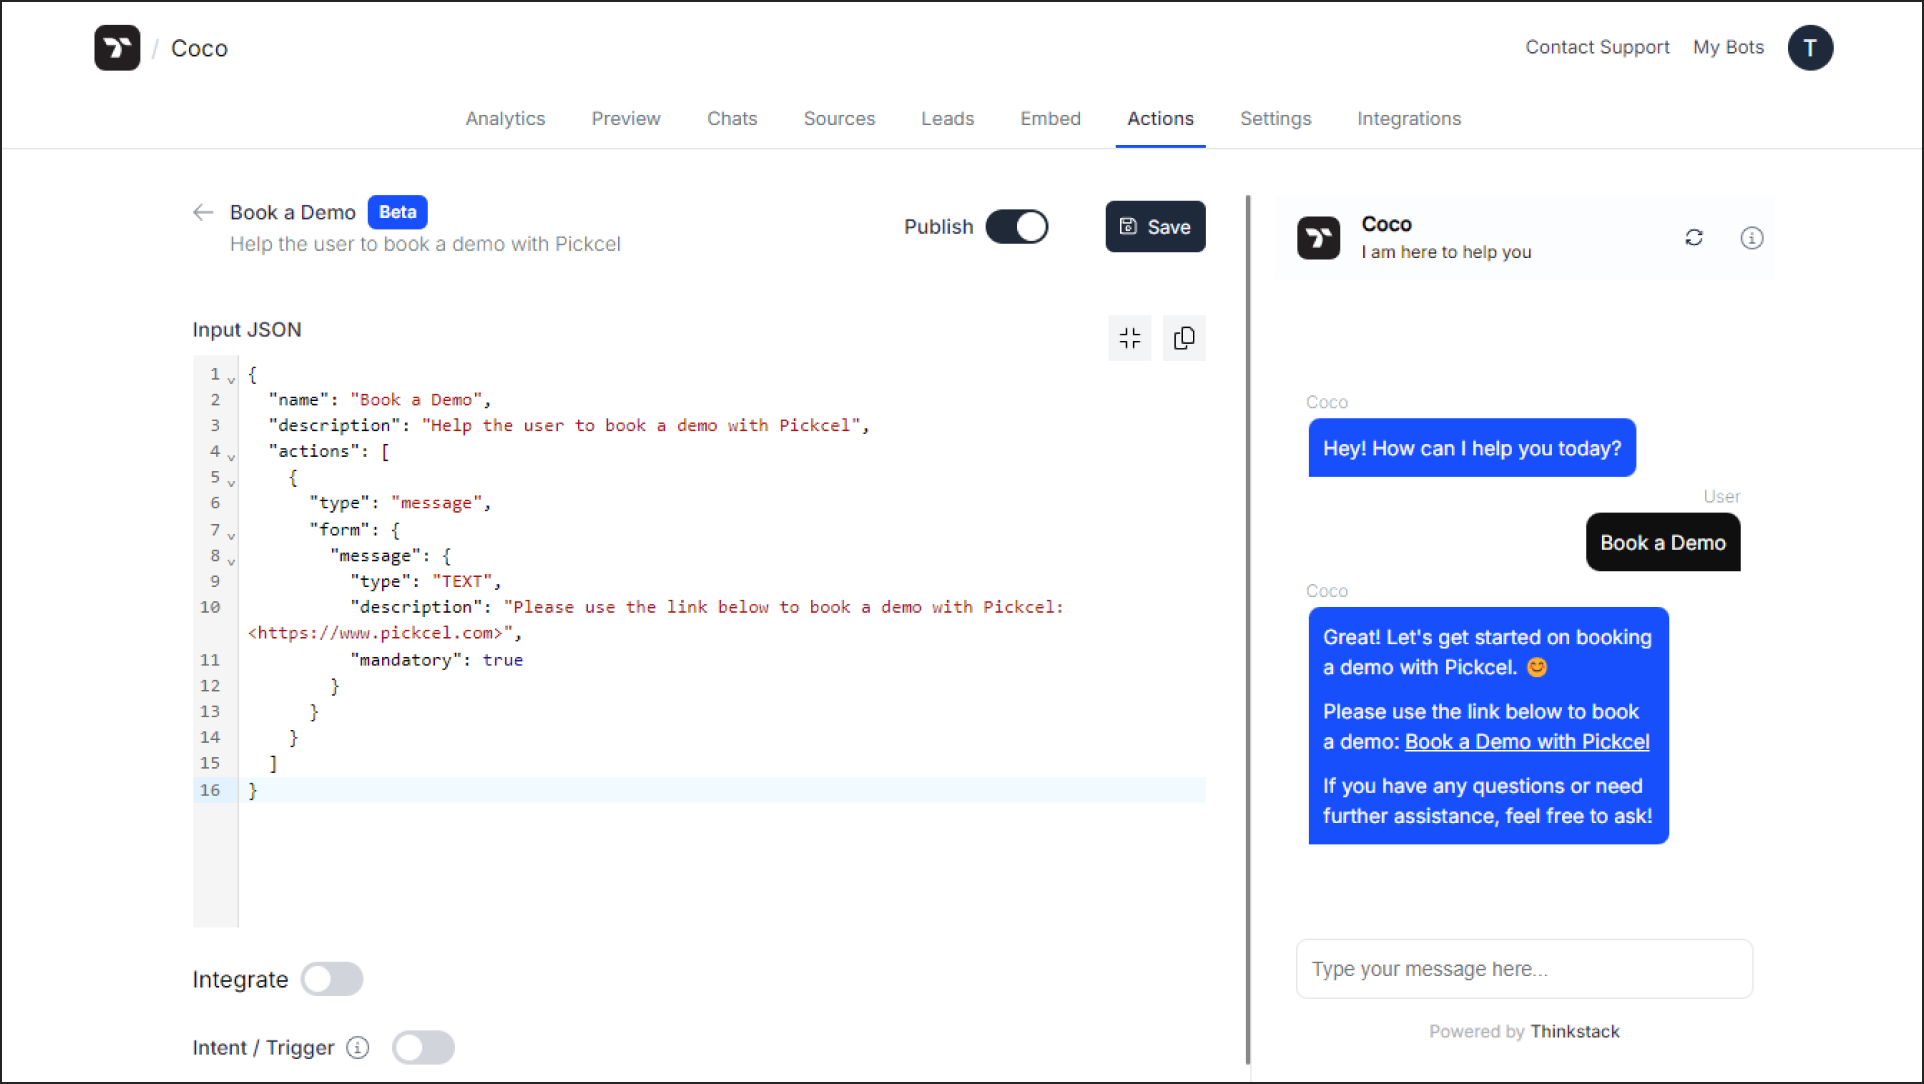
This structure allows the chatbot to deliver a static message or link instead of collecting user data. It’s useful for sharing actionable information, such as booking links or instructions.
Example JSON for Message:
{ "name": "Book a Demo", "description": "Help the user to book a demo with Pickcel", "confirmation_message": "To schedule your demo with Pickcel, please use the link provided below. Would you like to proceed?", "closure_message": "Thank you for booking your demo! We look forward to showcasing our solution and will follow up shortly.", "actions": [ { "type": "message", "form": { "message": { "type": "TEXT", "description": "Please use the link below to book a demo with Pickcel: <https://www.pickcel.com>", "mandatory": true } } } ]}🔸 type: message displays a static message with an actionable link or resource.
🔸 Simple Interaction: No additional data collection, focusing on delivering useful information.
How to Define Triggers for Actions#
To ensure the chatbot performs the desired action based on user input, you need to define specific intents and triggers. These triggers act as cues that signal the chatbot to execute the appropriate action.
1. Identify the Purpose of the Action#
• Clearly define the objective of the action (e.g., lead generation, booking an appointment, providing information).
• Determine what user inputs or behaviors will indicate the intent for this action.
2. Create Relevant Triggers#
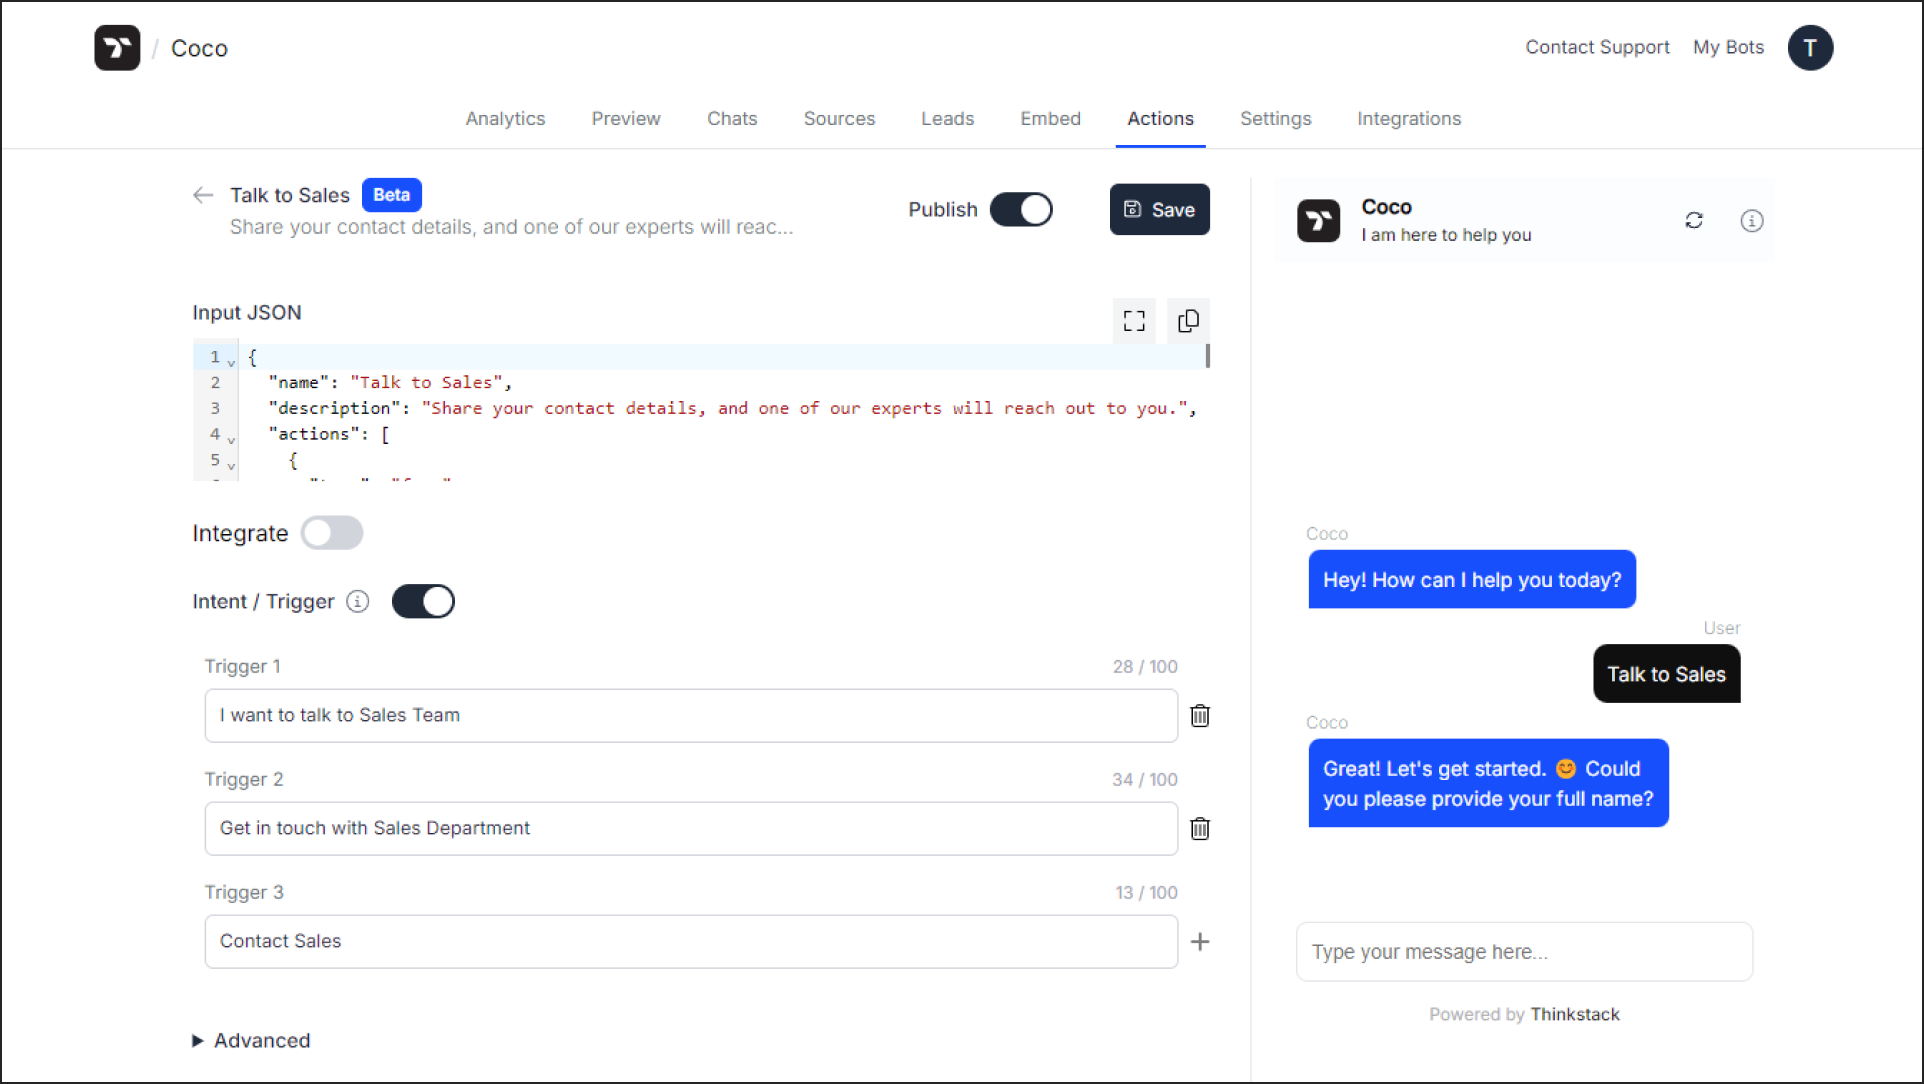
Toggle the Triggers button. Then use concise and clear keywords or phrases that users are likely to input.
Example:
• For lead generation: "talk to sales," "get in touch," "contact us."
 • For booking appointments: "schedule a meeting," "book now," "appointment."
info
Avoid Overlapping Triggers
Ensure that the triggers for one action do not conflict with those of another Action or Human-Handoff.
3. Test and Refine Triggers#
• On the right side you can simulate various user inputs and ensure the triggers activate the correct action.
• Adjust the triggers if the chatbot does not respond as expected.
Enable Chatbot Suggestions for Actions#
This feature allows chatbots to guide users seamlessly toward relevant actions. By enabling this option:
• Users will see tailored suggestions in the chatbot interface based on their interaction context.
• Suggestions serve as intuitive prompts, directing users to explore actions such as lead generation, booking demos, or accessing specific features.
To Enable This:#
Navigate to the Advanced Settings.
Toggle the Show in Suggestions option for your action.
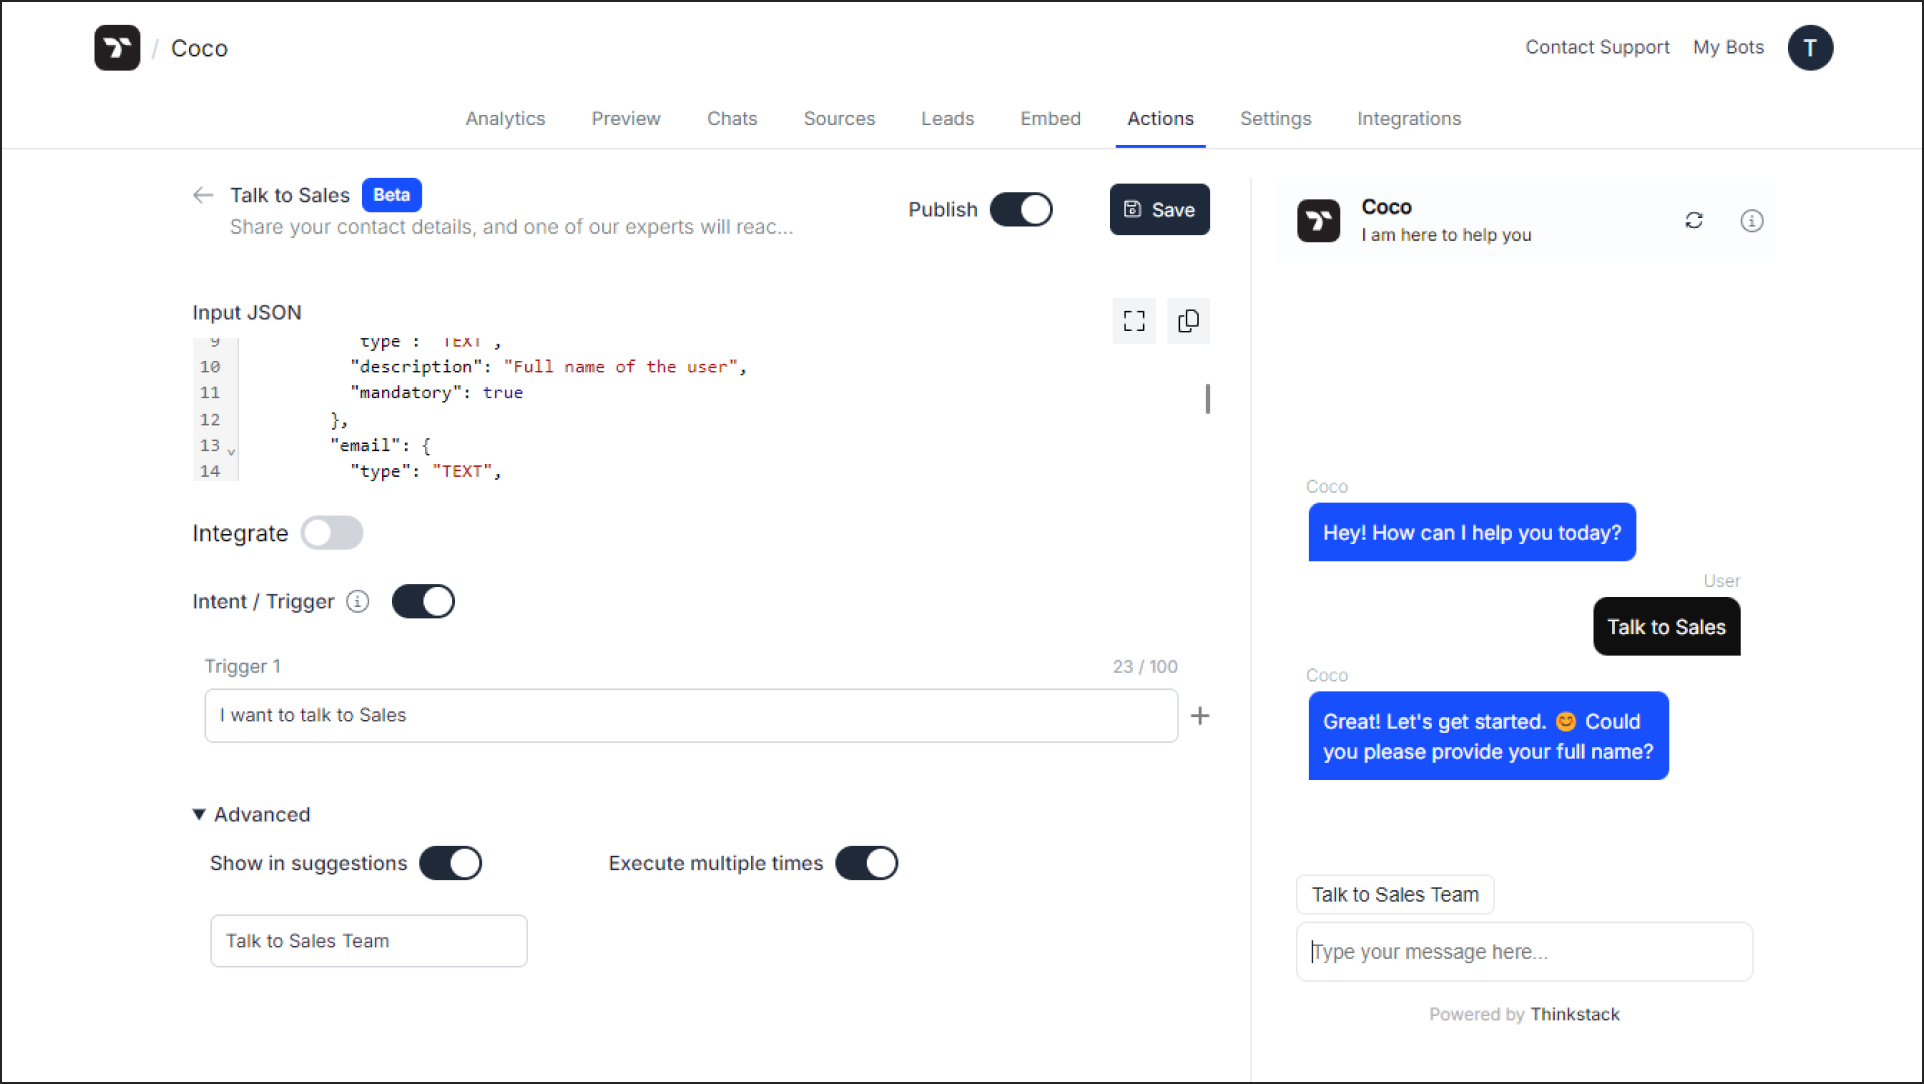
Provide a clear Suggestion Title that conveys the purpose of the action effectively.
Example: For a "Talk to Sales" action, the suggestion could read: "Connect with our Sales Team" or "Need Assistance? Reach Out to Sales."
This ensures that users are guided effortlessly and enhances the overall user experience by making the chatbot more intuitive.
Once you are ready with all the changes, click on Publish to apply the action on chatbot and proceed to Save the action.
That's a wrap 🎉. You are now ready to create your own actions in Thinkstack.